I'm visiting my family at the beach & decided to bring the fixin's for Tempeh Reubens, a decision I don't regret! The tempeh is from here, and apparently the lady who created it won a contest with it, so that's always a good sign. I didn't follow it exactly, so I'll just write what I did below. Oh, & I served it with that loveable Chipotle Kale Salad. <3
Tempeh Reubens *makes two*
- 8 ounces tempeh (cut into pieces the size of a pack of cards, then split horizontally, so they're 1/4-inch thick---or however you want it)
- 1/4 cup olive oil
- 1 tablespoon toasted sesame oil
- 1 tablespoon tamari
- 1/4 teaspoon paprika
- 1/4 teaspoon thyme
- pinch chili flakes
- 1 clove garlic, minced
- 4 slices bread, preferably rye
- sauerkraut
- sauce (I do half vegan mayo & half ketchup, with some caraway seeds)
Whisk together the olive oil, sesame oil, tamari, paprika, thyme, chili flakes, & garlic. Heat a pan over medium-high heat, dunk a few slices of tempeh into the marinade, then toss them into the hot pan. Cook them for a few minutes on each side, until they're done to your liking. As they finish cooking, set them aside & add a few more slices to the pan (you should whisk the marinade before each dunking, since it tends to separate).
While the last batch of tempeh is cooking, toast the bread. Slather some sauce onto all four slices of the toast. Then do the following to two of the pieces: pile on some drained kraut, add a few slices of tempeh, then top with the last two pieces of saucy toast. You could also add some cheese, avocado, sprouts, whatever. I kept it pretty simple & it was still amazing!
****************************************

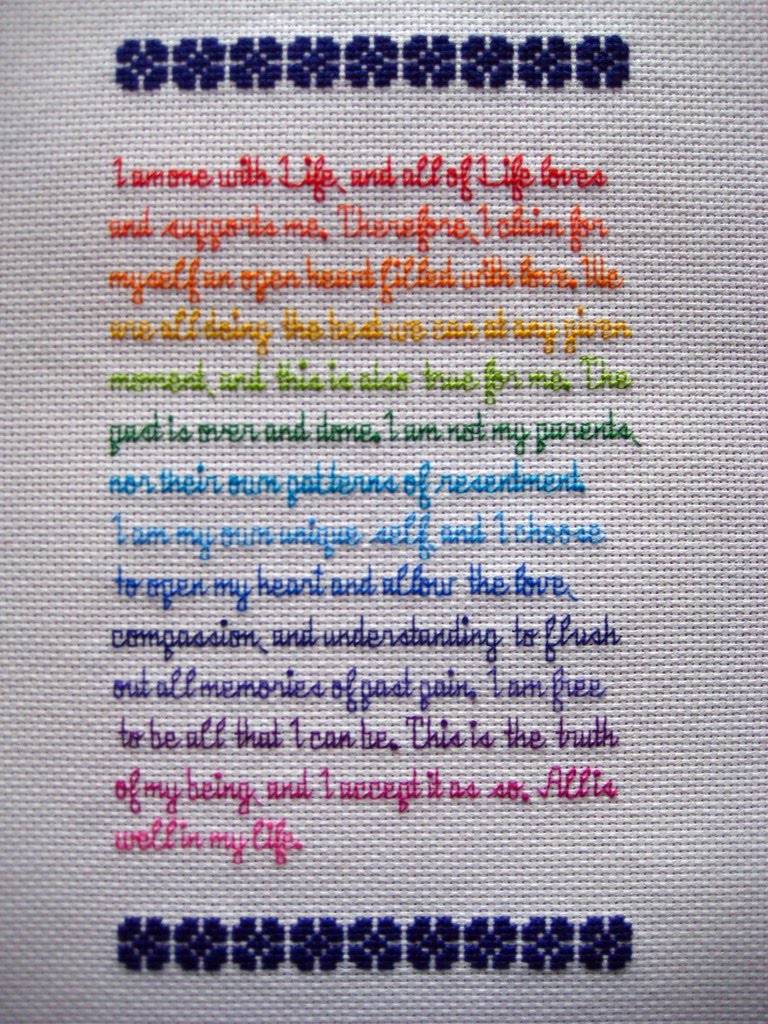
I barely finished the project in time, since Mom & Sean came out to visit yesterday, instead of today! It was fun. My sister came over, so Smels, Mom, Sean, Ethan & I went to Namaste Indian Cuisine, for delicious Indian food. It's so good. Sean ate three ice cream cones! They're those baby cones, but still!
This photo of the cross stitch is hard to read, so I'll type out the text. It's based on an affirmation by Louise L. Hay. I thought it would inspire Mom to keep on her path of self-healing. She's such a strong woman. I love you, Mom!

"I am one with Life, and all of Life loves and supports me. Therefore, I claim for myself an open heart filled with love. We are all doing the best we can at any given moment, and this is also true for me. The past is over and done. I am not my parents, nor their own patterns of resentment. I am my own unique self, and I choose to open my heart and allow the love, compassion, and understanding to flush out all memories of past pain. I am free to be all that I can be. This is the truth of my being, and I accept it as so. All is well in my life."
Send your moms some loving vibes, today & every day!
It's been a while since I've posted anything. We've been busy with school & company, so I haven't been crafting it up much, besides adding tons of fabric to my stash. :)
We're watching Ethan's parents' kitties, Yoda & Lady Bobcat. Yoda was our kitty, until a few years ago when he got hit by a car. Thank goodness he survived, but it took thousands of dollars & surgery to fix him up! We sent him to the coast so he could live a peaceful life in the forest, away from speeding cars. Now he's back for a visit, & he's older & wiser. No more dodging cars, kid!

Lady Bobcat was a feral kitty at Nestucca High School, until Ethan's mom, Cathy, rescued her. She was named after the Nestucca mascot, but we just call her Bobby. She's really sweet & has a funny, chattery meow. She LOVES my bed...
 Last weekend, we were fortunate enough to have my good friends from Washington visit us. Diane & I have known each other for 20 years, if you can believe that! I've known the kids since they were born, & babysat them a zillion times. It was so fun catching up with them! Eric, the oldest, is 18 years old & building a cabin, so he wasn't able to come down, but he wrote me a sweet card. They're such great kids!
Here are Diane, Marcus & Alaina:
 Ooh...Ethan found a new gamer bud. Marcus was trash-talking him right & left! Look out!
 In terms of food, I've been making lots of vegan soup on the weekends, then living off it for the week. It's super healthy & assures I'm getting plenty of veg. I usually freeze about half of what I make, so it doesn't go bad by Friday. A great trick I've discovered is blending 1 cup of cashews with 4 cups of water in my Vitamix. This "cashew cream" is a great addition to chowders. What I do is make the soup in a veggie broth base, then stir the cashew cream into it at the end. Ethan was going on about how good the potato chowder was, so I'm pretty sure it would pass for a "real" cream-based soup. Try it sometime!

My sister gave me the cutest gnome sandwich keeper, so I wanted to try making some from scratch. There's a lot of debate about lining them with various sketchy plastics, such as PUL, vinyl, etc., so I just lined mine with more cotton fabric. Who cares if the inside gets a little mustard-stained, am I right? And it's not like you'd pack super drippy sandwiches into these anyway, since they'd be soggy by the time lunch rolled around.
 The fabric I used were scraps from other projects & stuff I'd gotten from thrift stores. This tutorial was, by far, the simplest & most straightforward that I found. The fruit one is the first one I made, & is lined with that never-ending pink gingham. Thanks for holding it open for me, Mr. Fuzzy Owl!
 The blue flowery one is lined with some pink rose fabric, plus it has a heart applique on the front. :)
 Below is the cute, yet somewhat deformed, heart. The applique tutorial here is awesome. I used a plain stitch around the outside, rather than the fancy one shown, but I'm sure it'll stay put with the help of the fusible interfacing.

My sewing machine is my late Gran's Singer 404, so I don't have that neat-o zigzagging ability that most people use for appliques. I guess they made an attachment for this machine, but I haven't found one in Gran's stuff. Last night, I was looking for a zipper in the various tins & drawers which housed her sewing loot, when I realized that she was such a meticulous lady---she kept little dated notes with everything & marked future projects in pamphlets & magazines. So cute. Anything I sew that turns out half decent is dedicated to this fierce HBIC! :) I love you, Gran!
Like everyone else, I was super busy over the holidays, so blogging wasn't high on my list of priorities. I was lucky enough to have the opportunity to spend time with friends & family before getting sucked back into the Winter term of school.
Sean came out for a few days, so we headed to Mt. Tabor, our usual funtimes place!

Here's Smels & Mom's new-ishly adopted cat, Motley, who is finally getting brave enough to come downstairs from his lair.
 Here's our cute Momma, who is known to shield her face with an alien vag when she sees a camera. Just kidding, she was actually repairing this alien figurine that she got for my stepbrother.
 I wanted to share some of the recipes I made for gift-giving, since they were pretty delish!
Here are most of the plates I made for peeps. Instead of buying new ones, I got them at Goodwill. Much better to re-use ones that are already floating around the world, I say! There were Strawberry Jelly Dot Cookies, Chewy Gingerbread Trees, Chokeballs (Mexican Wedding Cookies), English Toffee & Honey Caramels. SO. MUCH. SUGAR.
 Here's what the finished product looked like. I used these cute, printable labels & a little ribbon for flair.
 Rows upon rows of honey caramels! I couldn't believe how long it took to wrap them all, but luckily I was watching Law & Order: Criminal Intent, w/my main man, Vincent D'Onofrio.
 I found the recipe here. The only things I did differently were to substitute honey for the corn syrup &, since I didn't have fleur de sel, I used kosher salt instead; despite panicked warnings on the internetz against using honey for candy-making, it worked perfectly, so yeah.
Honey Caramels
- 1 cup heavy cream
- 5 tablespoons unsalted butter, cut into pieces
- 1 teaspoon kosher salt
- 1 1/2 cups sugar
- 1/4 cup honey
- 1/4 cup water
Butter a square baking pan & line the bottom w/parchment, buttering that as well; set aside. In a small saucepan, bring the cream, butter & salt to a bowl; set aside.
In a heavy-bottomed, medium saucepan, boil the sugar, honey & water, stirring until sugar is dissolved (try not to splash the sugar up on the sides of the pan!). Boil, without stirring until mixture is a light golden color, gently swirling the pan occasionally.
Pour the cream into the caramel, being careful not to get splashed by the sputtering brew. Stick your candy thermometer on the side of the pan (don't let it touch the bottom though!) & simmer, stirring frequently, until mixture reaches 248*F.
Pour caramel delight into your prepared pan & let sit at room temp. until completely cooled. Once cool, cut into 64 pieces & wrap in 4-inch squares of wax paper. Be careful when you twist the sides, or you'll tear the paper. It gets easier as you go, especially if you watch Criminal Intent!
*****************************************
Another recipe that I make EVERY year is my Gran's Jelly Dot Cookies. The original recipe was from a Nucoa margarine package, hee hee.
Jelly Dot Cookies
- 1 cup butter, melted
- 1 1/2 cups brown sugar
- 2 eggs
- 2 teaspoons vanilla
- 3 cups flour
- 1 teaspoon salt
- 1/4 teaspoon baking soda
- 2 cups finely chopped walnuts, for rolling
- 1 cup jelly or jam of your choice (strawberry & raspberry are faves here)
Preheat oven to 350*F. Beat butter, sugar, eggs, & vanilla until smooth & slightly thick. Combine dry ingredients in a separate bowl, then add them to the first mixture, stirring until thoroughly mixed. If dough is too soft, chill it until it is workable. Form the dough into 1-inch balls, then roll them in the chopped nuts. Place them on a cookie sheet, about 1 1/2 inches apart. Bake for 10 minutes. Remove from oven & use your thumb (you may have to wait if you don’t have “asbestos fingers”) to make a dent in the center of each cookie. Then fill the dent with jam or jelly. Place back into the oven for 3-5 minutes, or until lightly browned, then devour these addictive beasts!*****************************************
Chokeballs
- 1 cup butter, softened
- 1/2 cup powdered sugar
- 1 teaspoon vanilla
- 2 1/4 cups flour
- 1/4 teaspoon salt
- 3/4 cup finely chopped nuts (walnuts or pecans are tasty)
- powdered sugar for rolling
Preheat oven to 350*F. Cream the butter, powdered sugar & vanilla until light. Add the flour & salt & stir until combined, then stir in the nuts. Roll mixture into 1-inch balls. Place on a cookie sheet (don't worry, they won't spread much at all) & bake for 15-20 minutes. Remove from oven & roll in the powdered sugar. Let cool, then re-roll them. Sometimes I give them a third roll, if I'm feeling saucy.
*****************************************
These next cookies were a first for me, but they were very good! I got several compliments on them, so I plan on making them again next year. The only thing I would change would be to add more salt to them. I made the dough a little differently too...
Chewy Gingerbread Cookies - 12 tablespoons butter
- 3/4 cup brown sugar
- 3/4 cup molasses
- 2 tablespoons milk
- 3 cups flour
- 1 tablespoon cinnamon
- 1 tablespoon ground ginger
- 3/4 teaspoon baking soda
- 1/2 teaspoon cloves
- 1/2 teaspoon salt (1 would double this next time)
Cream the butter, brown sugar & molasses until creamy. Add the milk & try to blend until it emulsifies as much as possible. In a medium bowl, combine the remaining ingredients & whisk them or sift them until they're blended. Slowly add them to the creamed mixture, stirring just until combined. Dough will be pretty sticky. If it's too sticky, chill it before rolling. If it's workable, roll it out, with a teensy bit of flour, until it's 1/2-inch thick. Wrap & chill for a couple hours or overnight.
Preheat oven to 350*F. Use cookie cutters to cut desired shapes & quickly put them on a cookie sheet (an inch & a half apart); bake for 8-12 minutes, rotating sheets halfway through. They are done when a gentle finger pressed into the center barely retains a fingerprint. One sheet of mine was a bit underbaked, so I put them back in for a couple minutes, which worked just fine. If you cook them too long, they won't be chewy, but they'll still taste good!
*****************************************
English Toffee
- 1 cup butter
- 1 cup sugar
- 1/3 cup brown sugar
- 2 tablespoons water
- 6-8 ounces dark or milk chocolate for spreading (amounts depend on taste)
- about 2 cups finely chopped nuts for sprinkling
Line a sheet pan with parchment & set aside. In a heavy-bottomed saucepan, melt the butter; add sugars & water. Stir, over medium heat, until it reaches a boil. Turn heat to somewhere between medium-low & medium. Don't stir very often, or you could summon the dreaded ~crystals~.
Stick your trusty candy thermometer on the side of the pan, careful to not let it touch the bottom. When the mixture reaches 300*F, it's ready. Pour it onto the parchment, WITHOUT SCRAPING THE PAN. There will be some candy left in there, but if you scrape the sides, you risk incorporating some sugar crystals into your toffee, which could cause the whole thing to crystallize. I know, it's a high stress situation, this toffee-making, but it's worth it. You can sort of lift & tilt the cookie sheet & allow the mixture to spread a bit, if you want it thinner.
Once it cools, melt some chocolate & spread it on the toffee. Sprinkle some chopped nuts on top of the chocolate, pressing them into it. Let the chocolate harden, then turn it over & repeat the process on the other side. When that side is hardened, break it into pieces & try not to eat it all!
*****************************************

 Yesterday, Smels came over, so I could show her the Wii---yeah, I've wanted one since they came out, & I couldn't resist any longer! :) I made her some Jammers, which are her favorite treat from Grand Central. She said they were perfect, yay! I didn't cut the jammers into circles, because I didn't want to deal with scraps. It just seemed simpler to form the dough into a rectangle, then cut it into 12 squares.
Before baking:

Grand Central Bakery Jammers
- 4 cups flour
- 3 tablespoons sugar
- 2 teaspoons baking powder
- 1/1/2 teaspoons salt
- 1 teaspoon baking soda
- 1 cup cold unsalted butter, cut into pieces
- 1 1/4-1 1/2 cups cold buttermilk (I squeezed the juice of one lemon into a measuring cup, then topped it off with 2% milk)
- about 3/4 cup jam (I used peach-lavender & strawberry)
Preheat the oven to 350*F. Line a baking sheet w/parchment & set aside.
In a large bowl, combine the flour, sugar, baking powder, salt & baking soda. Add the butter pieces & work it into the dry ingredients until teh mixture is mealy, with some quarter-sized pieces of butter remaining. Try not to let it get warm from your fingers; work quickly & pop it into the fridge if you think it's getting warm.
Pour 1 1/4 cups buttermilk onto the flour/butter mixture & work it in with your fingers. It's should be pretty dry, but hold together (sort of like a drier pie dough). If necessary, add more buttermilk, a tablespoon at a time.
Dump dough onto your counter. Pat it into a rectangle that's about 2 inches thick. Cut into 12 squares with a sharp knife. Carefully transfer the squares to your baking sheet (they're flaky & delicate at this point), spacing them about 1 1/2 inches apart.
Use your thumb to make an indentation into the jammers, & fill them with about 1 tablespoon of jam. Bake for 35-40 minutes, rotating the baking sheet halfway through. They're done when they reach a deep golden color.