Showing posts with label recipe. Show all posts

Tuesday, May 22, 2012

Raspberry-Chocolate Theme

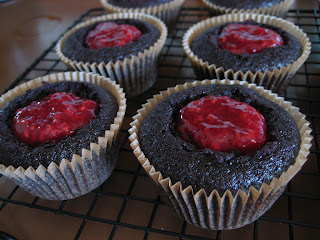
Apparently I've been enchanted by the combination of raspberries & chocolate lately, even though I just put that together.  Game of Thrones night ended up being postponed on Mother's Day, but I'd already began the cupcake baking process...luckily my roommates stepped up & offered to help take care of the excess. :)


The look like your ordinary chocolate cupcakes (& who would complain about that?!), but hidden inside is a tart raspberry filling:


They were so, so good.  I still have more raspberries in the freezer from last year's Sauvie Island berry-picking adventures, so maybe I can come up with one more chocolate-raspberry treat...

More recently, as in last night, my friend Megan & my sister wanted to have a themed dinner, since Megan is moving back to the Midwest soon.  They came up with "Vegan Breakfast Dinner", so Megan made waffles & sliced strawberries, my sister made her famously crispy potatoes & tempeh bacon, & I brought raspberry sauce & Nutella (chocolate & raspberry, for the win!).

The glorious spread:


My monstrosity:


I should probably share the Nutella recipe I used, which is from Veganomicon, a cookbook essential for living a good life. <3  I also want to try this recipe sometime, though it seems way more complicated. 

Not-tella
  • 5 ounces toasted, skinned hazelnuts (a generous cup)
  • 8-10 tablespoons neutral-tasting oil
  • 3/4 cup, plus 2 tablespoons powdered sugar
  • 1/4 cup cocoa
  • 1 1/2 teaspoons hazelnut extract (still good without this)
  • 1/4 teaspoon vanilla
I don't follow the directions in Veganomicon exactly, because I've had better results by blending the hazelnuts & oil (start with smaller amount, adding more if necessary) in a blender until creamy.  (A Vitamix is ideal, if you or someone you know has one.)  Slowly add the powdered sugar & cocoa, scraping down the sides of the blender as necessary.  Add the extracts & blend until smooth & creamy.  Enjoy it warm from the blender, or chill it for a thickened, spreadable treat.   

Bonus sleeping kitty shot!  Yoda almost looks innocent here, but don't let him fool you...


Tuesday, May 8, 2012

Sansa Stark Lemon Cakes & Peanut Butter Chocolate Cheesecake!

Sugar rush!  For last week's Game of Thrones viewing, I put those candied lemon peels to good use & made Sansa Stark Lemon Cakes.  People who have read the books might remember that lemon cakes were a common treat that Sansa liked to indulge in (before shit went down!).  Even if you're not at that level of nerd-itude, you can still enjoy these tasty cupcakes.  The recipe comes from "Vegan with a Vengeance" & they are the ultimate cupcakes for lemon-lovers---they're so tangy & don't weigh you down, like those (delicious) towering buttercream ones. <3


Lemon Gem Cupcakes   
  • 1 1/3 cups all-purpose flour
  • 3/4 teaspoon baking soda
  • 1/2 teaspoon baking powder
  • 1/4 teaspoon salt
  • 1 cup almond milk
  • 2/3 cup plus 2 tablespoons sugar
  • 1/4 cup freshly-squeezed lemon juice
  • 1/4 cup oil
  • 1 tablespoon lemon zest
  • 1 teaspoon vanilla  
Preheat oven to 350*F.  Line your cupcake tin with paper liners & set aside.

In a medium bowl, sift together the flour, baking soda, baking powder, & salt.  In a small-ish bowl, whisk together the almond milk, sugar, lemon juice, oil, lemon zest, & vanilla.  Add the wet ingredients to the dry ones & whisk until just combined.  This will be frothy!  Fill the cups about 2/3 full.  Bake for 17-20 minutes, or until a toothpick inserted into the center comes out clean.  Cool completely, then glaze them. 

*recipe makes 1 dozen, but I got 14*

Lemon Glaze
  • 1/4 cup softened margarine 
  • 2-4 tablespoons almond milk
  • 2 tablespoons freshly-squeezed lemon juice
  • 2 cups powdered sugar, sifted
Beat the ingredients together till smooth, adding a bit more milk if necessary.

After glazing the cakes, you can get all fancy & top them with candied lemon peel, tinted sugar, or sprinkles!  

 
As if those sweet cakes weren't enough, I also made a Peanut Butter Chocolate Cheesecake for my friend Sage & I.  She came down from Vancouver, B.C., & we needed something to nosh on while we gossiped.  The recipe is from here, but I made it in a tart pan, & used a cookie crust, rather than a graham cracker one.  It's very delicious, but next time I'll spread the crust with peanut butter before adding the filling, so it's peanut buttery-er.


Peanut Butter Chocolate Cheesecake

Filling
  • 1-12.3 ounce container firm silken tofu
  • 1/2 cup peanut butter
  • 1/2 cup chocolate chips, melted
  • 2 tablespoons almond milk 
Crust
  • 18 Newman-o's
  • 1/4 cup melted margarine
Make the crust first, by putting the cookies into your food processor.  Once they're reduced to crumbs, drizzle in the margarine & give it another whirl.  Press into whatever pan you want to use (pie plate, tart pan, springform) & chill it while you make the filling.


Wipe out your food processor (a few crumbs won't hurt!), then put all the filling ingredients into it.  Blend it all up, stopping to scrape down the sides of the bowl several times till it's smooth.  Pour the filling into the chilled crust, & spread it around in a cute pattern.  Chill for a few hours till firm.  Slice & enjoy with your buds! 


Friday, May 4, 2012

Candied Lemon Peel!

Candied citrus peel is something I've wanted to make for sooo long, but just never got around to.  It's so dainty & seems like it'd be a cute gift to give to someone for the holidays---especially orange peel dipped halfway in dark chocolate. :)

I recently checked out "Vegan Soul Kitchen" from my local library & noticed that it had a recipe for candied orange peel in there, but the recipe said you could substitute any citrus fruit.  The reason I wanted to make lemon peel, specifically, is for this week's Game of Thrones treat...I'll make a post for that in the next few days!


Here's my adaptation on Bryant Terry's recipe:


Candied Lemon Peel
  • 6 organic lemons, washed
  • 1 3/4 cups organic sugar, divided
Use a vegetable peeler to peel the lemon zest from the lemons.  I got about 5-7 thick strips, lengthwise, from each lemon (save the lemons for another project...maybe lemonade!).  Put the strips in a saucepan & cover them with a couple inches of water.  Bring to a boil, then simmer for 1 hour, until they're tender.  Drain & rinse them, then use a spoon to gently scrape any pith (this used to be the white, foamy part within the lemon) from the peels.  Cut the peels into 1/4-inch strips---no need for perfection here.  

Grab that saucepan again, but this time you'll add a cup of water, along with 3/4 cup sugar.  Bring it to a boil, add the peels, & simmer for about an hour, or until most of the sugar syrup has been absorbed.  

Drain the candied peels in a fine sieve, then roll them in the remaining 1 cup of sugar.  This part is kind of time consuming, but you can meditate or something while you work.*** 


***I recommend using the rad dredging technique where you use one hand for the wet & one hand for the dry, similar to when you bread stuff.  I used my right hand to pull out a gooey, drained strip & threw it into the sugar, then used my left to sprinkle sugar over the top, then tossed it around a little, before putting it on a rack to dry overnight.  Repeat this a million or so times, until you've rolled all your fancy strips.  They're so glittery!      

Saturday, April 28, 2012

Tempeh Reubens @ The Beach

I'm visiting my family at the beach & decided to bring the fixin's for Tempeh Reubens, a decision I don't regret!  The tempeh is from here, and apparently the lady who created it won a contest with it, so that's always a good sign.  I didn't follow it exactly, so I'll just write what I did below.  Oh, & I served it with that loveable Chipotle Kale Salad. <3


Tempeh Reubens      *makes two*
  • 8 ounces tempeh (cut into pieces the size of a pack of cards, then split horizontally, so they're 1/4-inch thick---or however you want it)
  • 1/4 cup olive oil 
  • 1 tablespoon toasted sesame oil
  • 1 tablespoon tamari
  • 1/4 teaspoon paprika
  • 1/4 teaspoon thyme
  • pinch chili flakes
  • 1 clove garlic, minced
  • 4 slices bread, preferably rye
  • sauerkraut
  • sauce (I do half vegan mayo & half ketchup, with some caraway seeds)

 Whisk together the olive oil, sesame oil, tamari, paprika, thyme, chili flakes, & garlic.  Heat a pan over medium-high heat, dunk a few slices of tempeh into the marinade, then toss them into the hot pan.  Cook them for a few minutes on each side, until they're done to your liking.  As they finish cooking, set them aside & add a few more slices to the pan (you should whisk the marinade before each dunking, since it tends to separate).

While the last batch of tempeh is cooking, toast the bread.  Slather some sauce onto all four slices of the toast.  Then do the following to two of the pieces: pile on some drained kraut, add a few slices of tempeh, then top with the last two pieces of saucy toast.  You could also add some cheese, avocado, sprouts, whatever.  I kept it pretty simple & it was still amazing!

**************************************** 


Thursday, April 26, 2012

Chipotle Kale Salad

This has become a regular thing around here, & seems to be a popular salad to share with friends & family.  I'm not sure of the recipe's source, but I got it from the prep recipe binder at my last job...

 
Chipotle Kale Salad

  • 1 large bunch kale, stemmed, chopped, washed & drained (about 5-6 cups)
  • 1/4 cup Vegenaise
  • 3 tablespoons apple cider vinegar
  • 2 tablespoons tamari
  • 1 tablespoon minced chipotle in adobo sauce
  • 1/4 cup finely chopped walnuts
  • 1/4 cup raisins
Try to get the kale as dry as possible, or you'll dilute the dressing; if you're the owner of a salad spinner, go ahead & spin that shit.  Place the kale in a large bowl, then whisk the remaining ingredients together in a small bowl.  Toss the dressing into the kale & eat!  (If you're one of those people who avoid "booger-y" raisins, add them right before eating, so your leftovers aren't full of plumpies.)  

**************************************** 

Here are a few photos of my new neighborhood, in all its glory...


Saturday, April 21, 2012

I'm Back...with Oodles of Recipes!

Why do I fail so hard at blogging? Not sure how some people stay motivated with it, but I go through (extended!) periods where I don't feel like documenting everything I cook & bake, ha ha. A lot has changed in my life recently---I graduated, moved to a new house (with a huge garden space!), had to leave my much-loved, long-term job (because it was through the university where I graduated), & a bunch of other personal stuff.

I feel excited about blogging again, not only because I'm back to eating a mostly vegan diet (I say "mostly" because I still eat honey, plus use wool for knitting, & don't feel comfortable identifying as a vegan)
& have been cooking/baking a lot, but because I want to keep track of crafty projects I'm working on, as well as documenting the gardening process over here. It's been SO LONG since I've been able to have an actual garden, rather than little containers full of puny tomaters & such. There's so much to learn & catch up on! Luckily, the Multnomah County Library system is so effing amazing, so I've put holds on a ton of organic gardening books; in fact, I need to pick up three of them today. <3


Because I have such amazing, supportive friends & family members that have been there for me during all this upheaval, I decided to thank a handful of them by cooking a feast the other night. I feel so fortunate that people are willing to have my back & go all "mama bear" for me (Coral, I'm talking about you!), plus they live close to me. Yay! The pictures of the food are pretty terrible, but I'm putting them on here anyway, mostly because I want to share the recipes I used. I didn't take pictures of my friends, since my sister & Saurabh were stuck in traffic, & got here a little late-ish, & also because I didn't want to stick my camera in their faces while they ate. Imagine that! :)


Without further ado, here's the feast, which included Rosemary Roasted Tofu w/Chipotle Mayo Dipping Sauce, Herb-Scalloped Potatoes, Roasted Beets & Sweets, Quinoa Pilaf, Fennel-Orange Salad, Chips w/Guacamole, Salsa & Hummus (Roasted Red Pepper & Regular), then Gingersnaps for dessert:


Recipe time! I made a shitload of everything, so you might want to halve the recipes if you don't want leftovers for life....

This tofu is from Bryant Terry, the author of Vegan Soul Kitchen. It's so simple, but people loved it! The texture is simultaneously crispy, chewy, & soft. While we were waiting for Smels & Saurabh to get here, I whipped up some Chipotle Mayo, in case people were in need of a little saucy oomph. I just stirred a little lemon juice & a couple minced chipotles into a good amount of Vegenaise. Voila!


Rosemary Roasted Tofu
  • 2 pounds extra-firm tofu, cubed
  • 1 tablespoon olive oil
  • 2 tablespoons minced fresh rosemary
  • 1/2 teaspoon paprika
  • 1 teaspoon salt
Preheat oven to 450*F. Toss all the ingredients together in a large bowl, then put them in a single layer on a parchment-lined sheet pan. Roast them for 20-25 minutes, turning them over halfway through the baking time.

****************************************

These taters are mostly from Veganomicon, but I made them a little differently, based on my fave scalloped potatoes recipe.
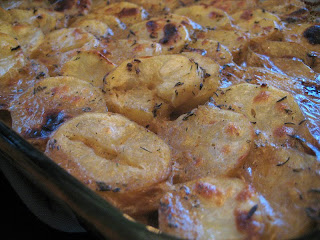

Herb-Scalloped Potatoes
  • 4 pounds potatoes, peeled (if desired) & thinly sliced
  • 2 tablespoons olive oil
  • 6 cloves garlic, minced
  • 3 tablespoons flour
  • 3 tablespoons nutritional yeast
  • 1 1/2 cups veggie broth
  • 1-2 cups almond milk
  • 1 teaspoon dried thyme
  • 1 teaspoon dried basil
  • 1 teaspoon dried dill
  • 1 teaspoon salt
  • 1 teaspoon black pepper
  • 1/2 teaspoon dried rosemary
  • 1/2 teaspoon paprika
Preheat the oven to 400*F & oil a 9X13-inch Pyrex dish. Layer the potatoes somewhat loosely & artistically in the Pyrex (you want the sauciness to be able to permeate & seep into the potatoes as they bake, so don't cram them in too tightly).

In a large saucepan, saute the garlic in the olive oil over medium-low heat till fragrant. Add the flour & nutritional yeast, then whisk in the broth & almond milk. Add the herbs & keep whisking occasionally until thickened. Gently pour the sauce over & into the potatoes---it helps to give the Pyrex a gentle back-&-forth shake to allow the sauce to get in thurrrr.

Cover loosely with foil & bake for 40-ish minutes. Uncover & bake 15-20 more minutes. Mine didn't brown, because the oven was so jam-packed, so I broiled them for a couple minutes towards the end.

****************************************

This is one of my favorite dishes to make! It's super simple & doesn't require a lot of work, but everything just meshes together so beautifully.


Roasted Beets & Sweets
  • 1 tablespoon olive oil
  • 6 beets, peeled & cut into chunks
  • 2 tablespoons olive oil
  • 3 medium sweet potatoes, peeled & cut into chunks (or a mix of sweets & yams)
  • 1 large sweet onion, cut into chunks
  • 1 teaspoon garlic powder
  • 1 teaspoon kosher salt
  • 1 teaspoon black pepper
  • 1 teaspoon sugar
Preheat oven to 400*F. In a bowl, toss together the beets & 1 tablespoon of olive oil, so they get coated. Place them on a heavy baking sheet in a single layer, & bake for 15 minutes.

While they're roasting, toss together (in that same old bowl) the remaining 2 tablespoons olive oil, the sweet potatoes, onion, garlic powder, salt, pepper, & sugar.

After the 15 minutes have passed, get out another heavy baking sheet & plop half the par-cooked beets onto that. Divide the sweet potato mixture between the two beet-y sheets, then toss the beets & sweets together. Put both sheets back into the oven & roast for 45 more minutes, flipping them a couple times. You probably want to rotate the baking sheets as well, so you have even browning on both pans.

****************************************
This is a nice alternative to rice pilaf, & can be made with whatever fresh herbs you have kicking around. I've made some changes to the recipe, but it's based on this one.


Quinoa Pilaf

  • 3 1/2 cups veggie broth
  • 2 cups quinoa
  • 1/4 cup olive oil
  • 2 cloves garlic, minced
  • 1/2 cup minced celery
  • 1/2 cup minced carrot
  • 1 cup minced onion
  • 6 tablespoons chopped fresh parsley
  • 2 teaspoons fresh thyme
  • salt & pepper to taste
Bring the broth to a boil in a large saucepan. Add the quinoa, cover, & simmer on low for 15 minutes. Remove from the heat, but set it aside to finish absorbing all the broth. In a big old cast iron pan, saute the garlic, celery, carrot, & onion in the olive oil over medium heat. When the veggies are softened & a little browned, stir in the cooked quinoa & fresh herbs, fluffing it all together. Season to taste.

****************************************

I found this recipe when I was cooking dinner for a veggie-loving, gluten-free friend. It's so light, refreshing, & simple!


Fennel-Orange Salad

  • 2 large fennel bulbs, thinly sliced (you can mince some of the fronds & toss them in too)
  • 4 medium oranges, peeled & segmented (or an equivalent amount of Satsumas, which I prefer!)
  • 2 tablespoons olive oil
  • 2 tablespoons red wine vinegar
  • salt & pepper to taste
  • 1/4 cup dried cranberries

Gently toss everything together & serve!

****************************************

The hummus was just a basic recipe, with extra cumin added. To half of it, I blended in some roasted red peppers as well---pretty & tasty! The guacamole consisted of a couple avocados, mashed w/some salsa, cumin, salt, lemon juice, & Franks Red Hot Sauce.

The chewy Ginger Cookies were especially for Ryan, who's not the biggest sweets-eater, but I guess he loves these particular cookies that I make every year for Christmas. Here's the recipe, if you wanna give 'em a go. I made this latest batch with butter, so I wouldn't be tempted to eat them all, yikes!

****************************************

Last, but not least, I wanted to share some balls with you! I made a trio of balls to send to my friend Laurel, who is studying in Laramie, Wyoming. They were part of a late birthday care package. If you don't eat honey, I'm sure that you could substitute agave nectar, maple syrup &/or brown rice syrup.


The balls in the back right of the photo were date-based, & included the super-food chia. I mainly followed this recipe, but I substituted chia for the flax, & rolled them in coconut. Next time, I'd probably double the spices because they're very subtle. Orange zest would also be good!


Spiced Chia Date Balls

  • 1 cup whole almonds
  • 1/2 cup ground chia seeds
  • 1/2 cup pitted dates
  • 1/2 cup raisins
  • 1/4 cup dried apricots
  • 1/4 cup unsweetened coconut
  • 1 teaspoon cinnamon
  • 1/4 teaspoon nutmeg
  • 1/8 teaspoon ground ginger
  • 1-2 tablespoons water (if necessary)
  • extra unsweetened coconut for rolling
Pulse together the almonds, chia, dates, raisins, apricots, coconut, cinnamon, nutmeg & ginger in a food processor, adding a little water if necessary. You want the "dough" to be sticky enough to hold together, but not wet. Once it comes together, form it into 1-inch balls & then roll them in the extra coconut.

****************************************

The balls on the front right were cashew-y, & inspired by this recipe.


Cashew Butter Energy Balls
  • 1 cup cashew butter
  • 2 tablespoons honey
  • 1/2 cup quick oats (or pulse some regular oats in your food processor)
  • 1/2 cup chocolate chips
  • 1/2 cup raisins
  • pinch salt

Mix everything together, then roll into 1-inch balls. Mine didn't turn out sticky enough to necessitate coconut, but the original recipe calls for it. Maybe play it by ear...

****************************************

The last balls (on the left) were peanut butter chocolate balls, based on these ones.

Peanut Butter Chocolate Energy Balls

  • 3/4 cup peanut butter
  • 1/4 cup honey
  • 1/4 cup quick oats (or pulse some regular oats in your food processor)
  • 1/4 cup chocolate chips
  • 1/4 cup dark cocoa powder
  • pinch salt
  • unsweetened coconut for rolling
Mix everything but the coconut together. Form into 1-inch balls, then roll in the coconut.

****************************************

BALLZ!

Monday, August 29, 2011

Canning & Bike Riding Fun!

Early last week, I went to visit Coral & she sent me home with a ton of leftovers from the wedding, including several pounds of plum tomatoes (7 1/2 lbs.) & Anaheim peppers (4 1/2 lbs.). They sat in our basement for a couple days, while I wondered what I should make with 'em. I finally decided to make canned diced tomatoes & pickled Anaheim slices. For the peppers, I used a basic pickling brine, & added garlic, mustard seeds, peppercorns & a hot pepper to each jar. I have to wait about a month to try them (so they can develop their flavor), but I hope they're good! The tomatoes are just lemon juice, salt & tomatoes, so they'll be pretty versatile.

Before pickling:


After pickling:


Smels was gone all last week. Coral's sister, Laurel, had to head back to school in Wyoming after the wedding festivities were over, so Smels went with her & they had a fun road trip. All four of us: Coral, Laurel, Chelsea (Smels) & me, have been friends since we were toddlers. Their mom is like my second mother, & they're all such dear friends. <3 <3 <3

Thankfully, Smels is back. She got me this beautiful bowl in an antique store. I love it! It feeds my bowl habit & matches my tiered candy dish thingy too. :)


Yesterday, before work, my sister & I went to the King Farmers Market. I got some basil & Walla Wallas, & a treat from the Grand Central stall. Plus we each got a free bag at the Farmers Market, which was cool:


After that, we decided to go on a bike ride to the Columbia Boulevard Wastewater Treatment Plant, then the Smith & Bybee Wetland area. Whoa...going to a stinky sewage place, for fun?! Well, there are both the Peninsula Crossing Trail & 40-Mile Loop around there, & Smels knows some good blackberry-picking spots nearby. We picked 4 quarts of them, so she can bake a pie or two.


We also saw three Western painted turtles! They were far away, sunning on a floating log, so forgive the blurriness:


After our berry picking, we rode to Kenton & went to an antique store, the library, & then got iced mochas at Posies Bakery & Cafe. Tasty!

Now for something sugary: the other night, I whipped up some raspberry crisp for a dinner at Smels' house, so I made a behbeh portion for myself too, mwa ha ha. I used the same filling as this raspberry pie, but cut down on the sugar, since the topping is sweet, unlike (most) pie crust.


This happens to be my favorite-est crisp topping in the Universe...

Fruit Crisp Topping
  • 1 cup flour (white whole wheat is my favorite)
  • 1 cup oats
  • 1 cup brown sugar
  • 1/2 cup butter, melted
  • 1/4 teaspoon baking soda
  • 1/4 teaspoon baking powder
Mix everything together until combined. Just lightly sweeten & thicken your favorite fruit by tossing it with some sugar & either cornstarch or flour, then put it in a casserole dish, generously layering a bunch of this topping over it. Bake at 350*F until the fruit is bubbling & the top is brown, around 45-55 minutes. I usually lightly cover mine towards the end of baking, to prevent over-browning. Don't cover tightly though, or you'll steam your crisp, making it pasty & sad. :(

****************************************


Ooh, I also made some Pad Thai today, using Pim's guide, but substituting vegetarian fish sauce for the real deal. I got mine at Fubonn, but it's probably available at larger Asian grocery stores. The resulting dish was pretty tasty. I made it with ingredients I had around (carrots, basil, tofu, egg, cilantro, Walla Walla onion, jalapeno, etc.), so it was far from authentic, but I was satisfied with it nonetheless.


Wednesday, August 24, 2011

Coral & Ryan Get Hitched!

Wow, this has been an amazing process, & now it's time to relax! Coral has spent so long planning her & Ryan's beautiful day, & it sure paid off. Everything was lovely & perfect in the end!

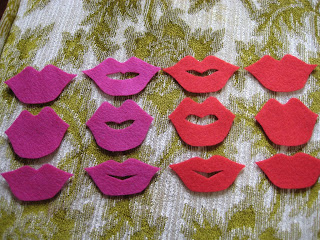
I'll start out with the prep work that I was responsible for. Ryan & his awesome friend, Chris, built a photo booth from scratch! Coral asked me to make some silly props for it. It took a while to get the method down, so I started on the simplest pieces, the lips.

Here's the first batch, on our trippy green couch:


The felt wasn't stiff enough to hold up on it's own, so I ended up painting them with diluted wood glue & letting them dry. Then I hot glued them to sticks. Some shapes were easier to cut with scissors, while others (especially the glasses) were easier with the Exact-o knife. For the glasses, I actually painted entire sheets of felt with the watered down glue, then let it dry before cutting them out. I'm not exactly sure of the method the people who sell them on Etsy use, but you couldn't pay me to sell these things, ha ha!


I was also asked to cut a couple dozen burlap table runners. Good thing we have a big basement crafty area now! It's not easy to find 10 ft. of blank space for cutting fabric. :)

Ready to be delivered to Coral:


My biggest contribution to the wedding was in the form of baked goods. Coral wanted 125 or so cupcakes, half carrot cake w/orange cream cheese frosting, & half traditional butter cake w/chocolate frosting. She also wanted 150 lemon bars, but they only needed to be a square inch, so that wasn't too bad.

The recipe I used for the lemon bars is available here. I've used it before. I really like the texture of the bars & they aren't as "wet" as traditional ones, so they won't get weepy & soggy.

What got me was the last-minute cutting & frosting! I baked the lemon bars & carrot cupcakes the day before, & also prepped the frosting, but wanted to wait till the day of the wedding to bake the butter cupcakes. Rose Levy Beranbaum, goddess of baking, recommends serving them on the day you bake them, so I wanted them to be as fresh as possible.

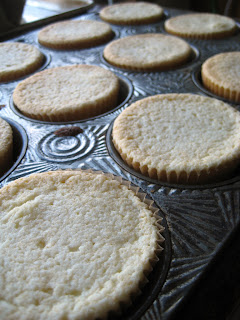
Here's the first dozen, fresh from the oven.


The recipe I used was for Downy Yellow Butter Cake from the Cake Bible. I used 3 tablespoons of batter & baked them @ 350*F for about 28 minutes. Even though I'm a baker, I don't really love cake that much. I'd much rather have some chocolate or a cookie, but this recipe is so amazing. It's light & fluffy, with such a deliciously sweet buttery flavor. I'd even prefer it plain, or with some macerated fruit on top. Mmmmm...

Here's some of the frosted lovelies:


The carrot cake recipe was an original that I've tweaked over the years at work. I added raisins & walnuts to these, but coconut &/or pineapple would also work. Yes, the recipe is eggless! It's also great with soy milk in place of dairy, for a vegan version.


Carrot Cake with Orange Cream Cheese Frosting
  • 1 1/4 cups flour
  • 1 1/8 tsp. baking soda
  • 1/4 tsp. plus 1/8 tsp. baking powder
  • 1/4 tsp. plus 1/8 tsp. salt
  • 1/4 tsp. plus 1/8 tsp. cinnamon
  • 1/4 tsp. plus 1/8 tsp. ground ginger
  • 1 cup sugar
  • 1/3 cup oil
  • 1/2 cup milk with 3/4 teaspoon lemon juice added (or buttermilk)
  • 1 1/2 teaspoons vanilla
  • 1 1/2 cups finely grated carrots
  • 1/3 cup raisins
  • 1/3 cup chopped walnuts
Frosting:
  • 8 oz. cream cheese, softened
  • 1/4 cup unsalted butter, softened
  • 1 cup powdered sugar
  • pinch of salt
  • zest of 1/2 an orange

Preheat the oven to 350*F. Line a 12-cup cupcake pan with paper cups & set aside.

In a small bowl, whisk together the flour, baking soda, baking powder, salt, cinnamon & ginger; set aside.

In a large bowl, whisk together the sugar, oil, milk, vanilla, carrots, raisins & walnuts.

Add the dry ingredients to the wet ones & mix until combined. Scoop 3 tablespoons of batter into each paper cup. Bake for about 25 minutes, or until a toothpick inserted into the center comes out clean.

There will be enough extra for another cupcake or two, or a baby cake for the baker!

Cool completely, before frosting generously. To make the frosting, whip all the ingredients together. Try not to eat it by the spoonful!

****************************************

And here are some pictures of the payoff of so much hard work by so many incredible people! I would have taken more pictures, but I was helping to set up, then had to get bedecked in my bridesmaid attire.

First of all, here is the beautiful bride. Did I mention that she made her entire dress herself?! One of her sweet neighbors happens to be a retired professional seamstress & she was a godsend! Coral also sewed the two flower girls' dresses, & all the bridesmaids' dresses. There is nothing she can't do!

Coral & Smels:


Smels literally teared up at Coral's beauty! :')


Here's a shot from under the tent. Look at the beautiful place settings! And I spy my old frenemy, Mr. Burlap! See the little jars of light & dark honey that we got as wedding favors?


And now for the dessert table, which was breathtakingly beautiful, thanks to Coral's thoughtful planning. I was honored to have my baked goods be a part of something so stunning. One of her friends from work, who does some catering, baked chocolate chip cookies too!

At this point, we were in the process of setting the cupcakes out at the last possible minute, since it was so hot out. The poor babies already had a long trip in the hot trunk of my (no air conditioning) car, so they were nervous to be displayed! We set 2 or 3 on each antique, floral saucer.


This sort of shows the left side of the table:


And this shows the right side:


I almost forgot to mention the cake! Coral wanted something tiny & rustic, so her & Ryan would have something to cut & shove into one another's face (lovingly, of course!). You can see the frosting was getting that glossy, I-want-to-melt-but-I-won't look to it. Thankfully, it held up for the whole evening! Whew!


Smels & Ethan show wear from too much good food & booze:


I'll end with a couple of photo booth pictures. Outside the booth, there was a table set up with a scrapbook, markers, glue sticks & scissors, so guests could leave a cute picture & note for the newlyweds.

Ethan & I:


Smels & I:


We love you, Coral & Ryan! Congratulations on your new life together!